How to Pour a Concrete Slab Step by Step, and What You Save
Published · Updated
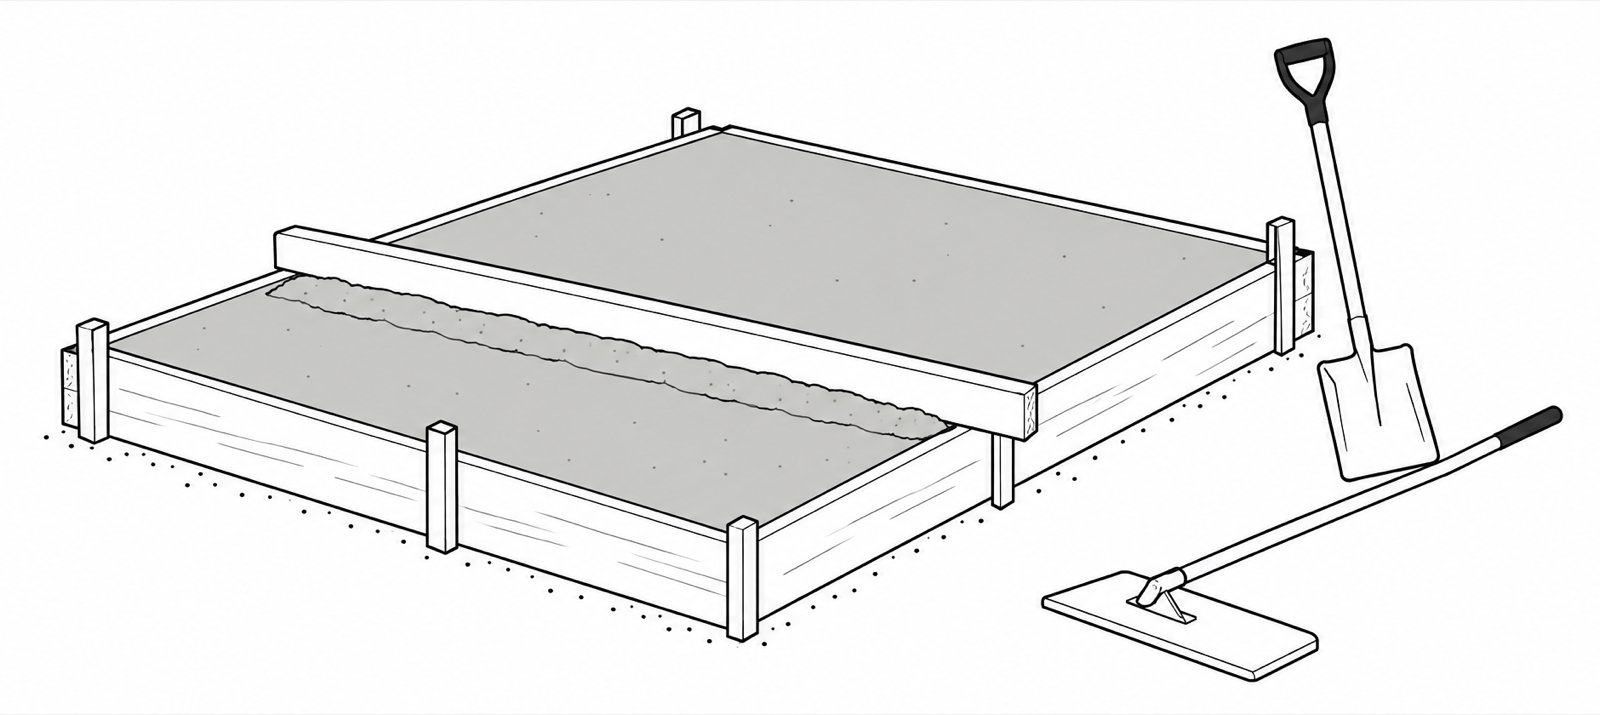
This guide shows how to pour a concrete slab for a shed base, a patio, a walkway or a small driveway pad. It does not cover house foundations or slabs built for heavy loads.
The work runs in a fixed order. Call 811, prepare the ground, build the forms, set any reinforcement, order the concrete, then pour, finish, cut joints and cure. Most of the effort comes before the truck arrives. Once the concrete is in the forms, it sets on its own schedule.
Each practice below is tied to the source that states it, mostly the National Ready Mixed Concrete Association (NRMCA) and its Concrete in Practice (CIP) sheets. Prices come from this site’s cost model at national-average rates. Read them as estimates. They are not quotes.
Can you pour a concrete slab yourself?
Yes, a DIY concrete slab is realistic if the slab is small and you can line up help. What you take on is the physical work and the timing.
NRMCA calls having the proper manpower and equipment, and timing the operations properly, critical, and concrete does not wait. Plants allow a limited time to unload before they charge for waiting. One published price list gives 60 minutes. Ask your plant for its allowance.
Size sets the difficulty. A 10×10 ft slab, 4 inches thick, holds 1.2 cu yd. In 80 lb bags that is about 56 bags, or 4,480 lb of dry mix to carry and mix by hand.
A 20×20 ft slab holds 4.9 cu yd, about 222 bags. At that size most people order from a plant. The concrete yard calculator compares bags with a truck for your own dimensions.
Hire the job out if the slab is structural, attaches to a house or will carry heavy loads. Those are design decisions, and this guide does not cover them.
DIY or contractor: what the price is made of
Doing the work yourself removes two lines from the bill: labor and the fixed fee. It does not remove the concrete. This site prices a slab as a fixed fee plus materials plus labor, and the methodology page explains each part. The table splits the national-average price for two slab sizes into those parts.
| Row | 10×10 ft slab | 20×20 ft slab |
|---|---|---|
| Concrete in the slab4 in thick, before waste. | 1.2 cu yd | 4.9 cu yd |
| Same volume in 80 lb bagsDry mix to carry and mix by hand. | 56 bags4,480 lb | 222 bags17,760 lb |
| Contractor priceU.S. national average, all parts below. | $1,460 – $2,890typical ≈ $2,170 | $3,010 – $5,980typical ≈ $4,500 |
| Concrete and formsMaterial only. | $248 – $493 | $590 – $1,170 |
| Gravel baseMaterial only. | $36 – $71 | $144 – $285 |
| Labor and placement | $368 – $732 | $1,470 – $2,930 |
| Fixed feeSite setup and delivery. | $803 – $1,600 | $803 – $1,600 |
| Materials you buy yourselfConcrete, forms and gravel. | $284 – $564typical ≈ $424 | $734 – $1,460typical ≈ $1,100 |
| Share of the contractor price | 20% | 24% |
| Worker-hours in the labor lineForms through finishing, at a professional pace. | 6.8 hours | 27 hours |
- The price is this site's national-average estimate for a 4 in slab on a 4 in gravel base, the same figures as the size table on the concrete pad calculator. Every share divides by the typical value shown under each range.
- "Materials you buy yourself" is the concrete, forms and gravel lines added together. It leaves out tools, disposal of the soil you dig out, permits, your own time and the cost of a mistake, because this site has no sourced price for them. Read it as a floor.
- The 10×10 ft order is under the 3.5 cu yd minimum load this site assumes, so its concrete line includes a short-load fee.
- The fixed fee is one of this site's assumed parameters, and the labor rate is calibrated from published labor price ranges. The methodology page lists both.
On the 10×10 ft slab, materials are about 20% of the contractor’s price. On the 20×20 ft slab they are about 24%. The rest is labor and the fixed fee.
The fixed fee changes the most. It is 55% of the price on the 10×10 ft slab and 27% on the 20×20 ft slab. A flat price per square foot would hide that.
Labor moves the other way: 25% of the small slab’s price and 49% of the large one’s. The chart shows all six sizes this site prices.
A contractor adds about $1,170 to $2,330 of labor and fixed fee to the 10×10 ft slab and about $2,280 to $4,520 to the 20×20 ft slab. The labor line assumes 6.8 worker-hours for the small slab and 27 worker-hours for the large one, at a professional pace. A first-timer will take longer, and the pour has a deadline.
Read the DIY concrete slab figure as a floor. It leaves out the tools you buy or rent, hauling away the soil you dig out, permits, your own time and the cost of a mistake. This site has no sourced price for those, so it does not guess one.
The saving only holds if the slab comes out right. The rest of this guide covers the steps where it most often does not.
Tools and materials for a concrete slab
Gather these before the day of the pour.
Materials:
- Ready-mix concrete, or bagged mix for a very small slab
- Clean gravel for the base
- Form boards and stakes
- Reinforcement and bar supports, if you use them
- Premolded joint filler for any edge that touches a wall, a footing or another slab
- Curing compound or plastic sheeting
Tools:
- Shovel and a rake for the gravel
- Hand tamper, or a rented plate compactor
- String line and a level
- A straight screed board longer than the slab is wide
- A square-ended shovel or a come-along to move the concrete
- Bull float or darby, and a hand float
- Mason’s trowel and an edging tool
- Jointing tool, or a concrete saw
- Push broom
- Wheelbarrow or buggy
Wear gloves and boots. NRMCA says fresh concrete should not touch skin or eyes, and that you should wash it off at once with clean water.
Before the pour: a checklist
Ready-mix concrete is a timed delivery. NRMCA says to finish all the site preparation before the concrete arrives, because delays after it arrives lower the quality of the slab. Check each item the day before.
- Utilities marked. You called 811 a few business days ago and every utility has responded.
- Ground ready. Topsoil and soft spots are gone, the base is compacted and the slope is set.
- Forms set. They are at final height, checked for level and slope, and braced.
- Reinforcement placed and supported, if the plan uses it.
- Volume ordered. You measured the forms and added an allowance for waste.
- Mix ordered. Strength, air content and slump suit where the slab sits.
- Truck route walked. You know how far the chute reaches and whether you need a wheelbarrow run or a pump.
- Weather checked. The ground is not frozen. NRMCA lists wind above 5 mph, low humidity and heat as the conditions that raise the risk of cracking while the surface is still wet. For a pour in the cold, read pouring concrete in cold weather.
- Help lined up and tools on site before the first load.
- Unloading time confirmed with the plant.
- Curing materials on site, ready to go on as soon as finishing ends.
How to prepare the ground for a concrete slab
Call 811 first
811 is the free national before-you-dig service. Call it, or use your state 811 center’s website, a few business days before you begin any digging. Wait until every utility has responded before you break ground. The FCC notes that local laws often require it.
Dig out the slab area and compact the base
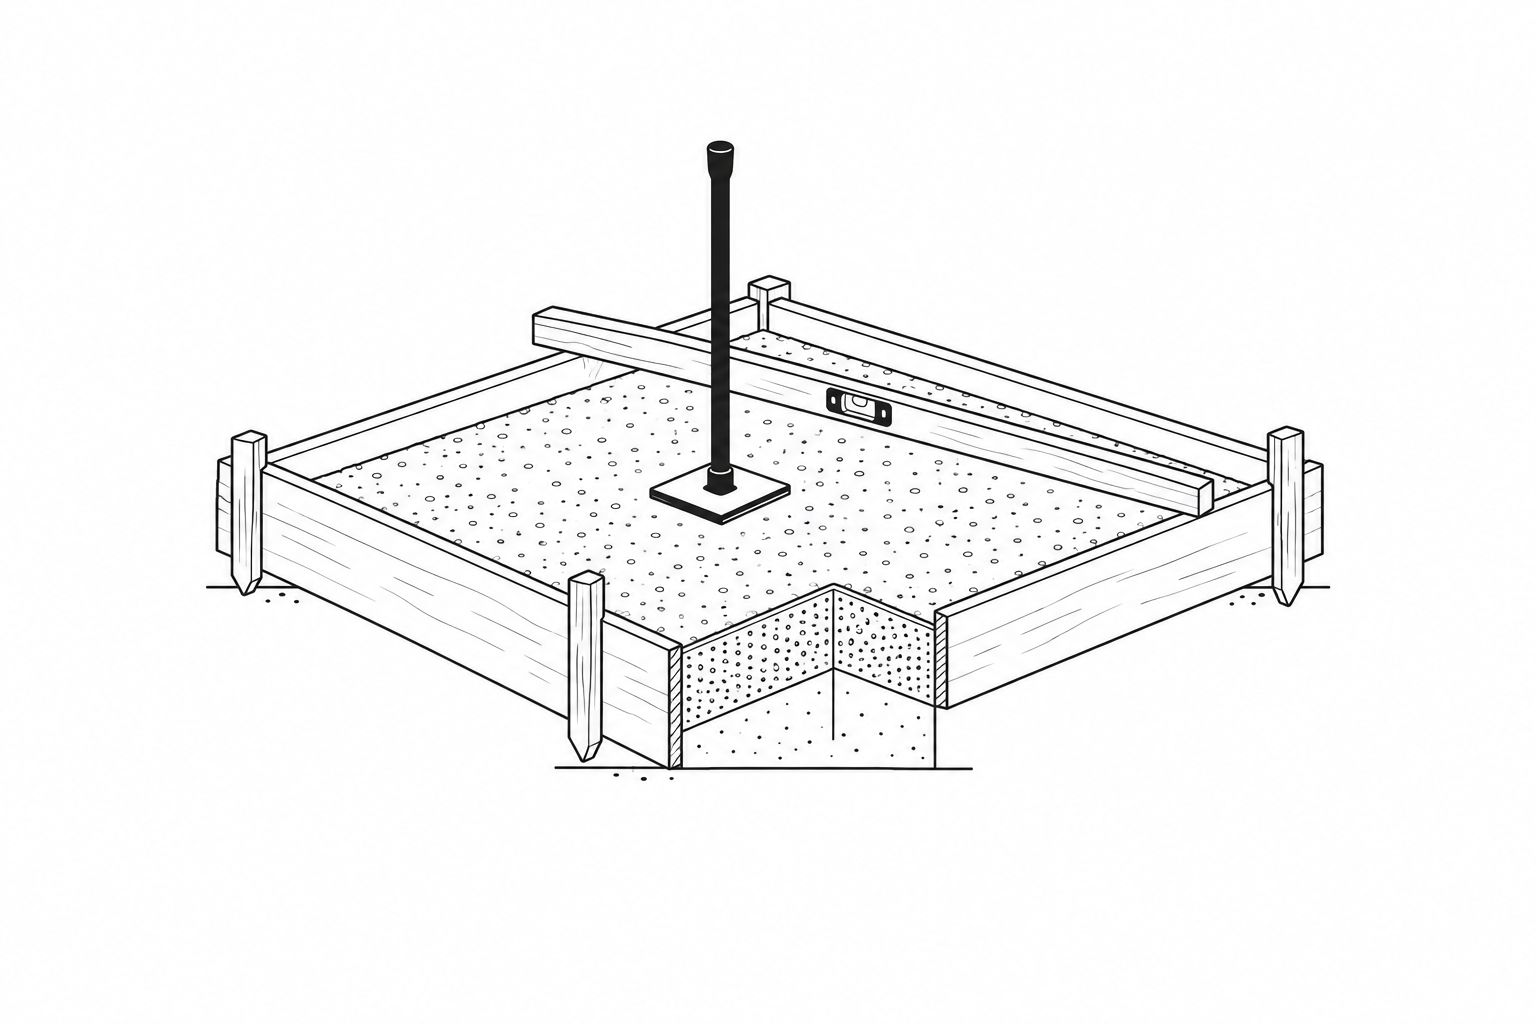
Remove the topsoil and any soft spots. NRMCA says the soil beneath the slab should be compacted soil or granular fill, well compacted by rolling, vibrating or tamping. The slab and the ground under it should slope to drain. Do not place concrete on a frozen subgrade.
For floors inside a house, the International Residential Code asks for a 4-inch base course of clean graded sand, gravel, crushed stone or crushed concrete. Well-drained soils are exempt. Patios and driveways fall outside that section.
This site’s estimates use the same 4 inches of gravel under a slab 4 inches thick. The same code section sets a minimum floor thickness of 3½ inches. The concrete pad calculator lets you set the thickness.
Dig the bed evenly. A 1/8-inch difference in a 4-inch slab is a 3 percent shortage of concrete.
Build the forms
Set form boards at the finished height of the slab and stake them. NRMCA says forms must be braced so they withstand the pressure of the concrete without movement. Check the level and the slope with a string line and a level.
Put premolded joint filler against anything the slab will touch: a house wall, a footing, a sidewalk or a garage slab. NRMCA calls these isolation joints. In dry weather, lightly dampen the base and the forms just before the pour, and the reinforcement too if you use it.
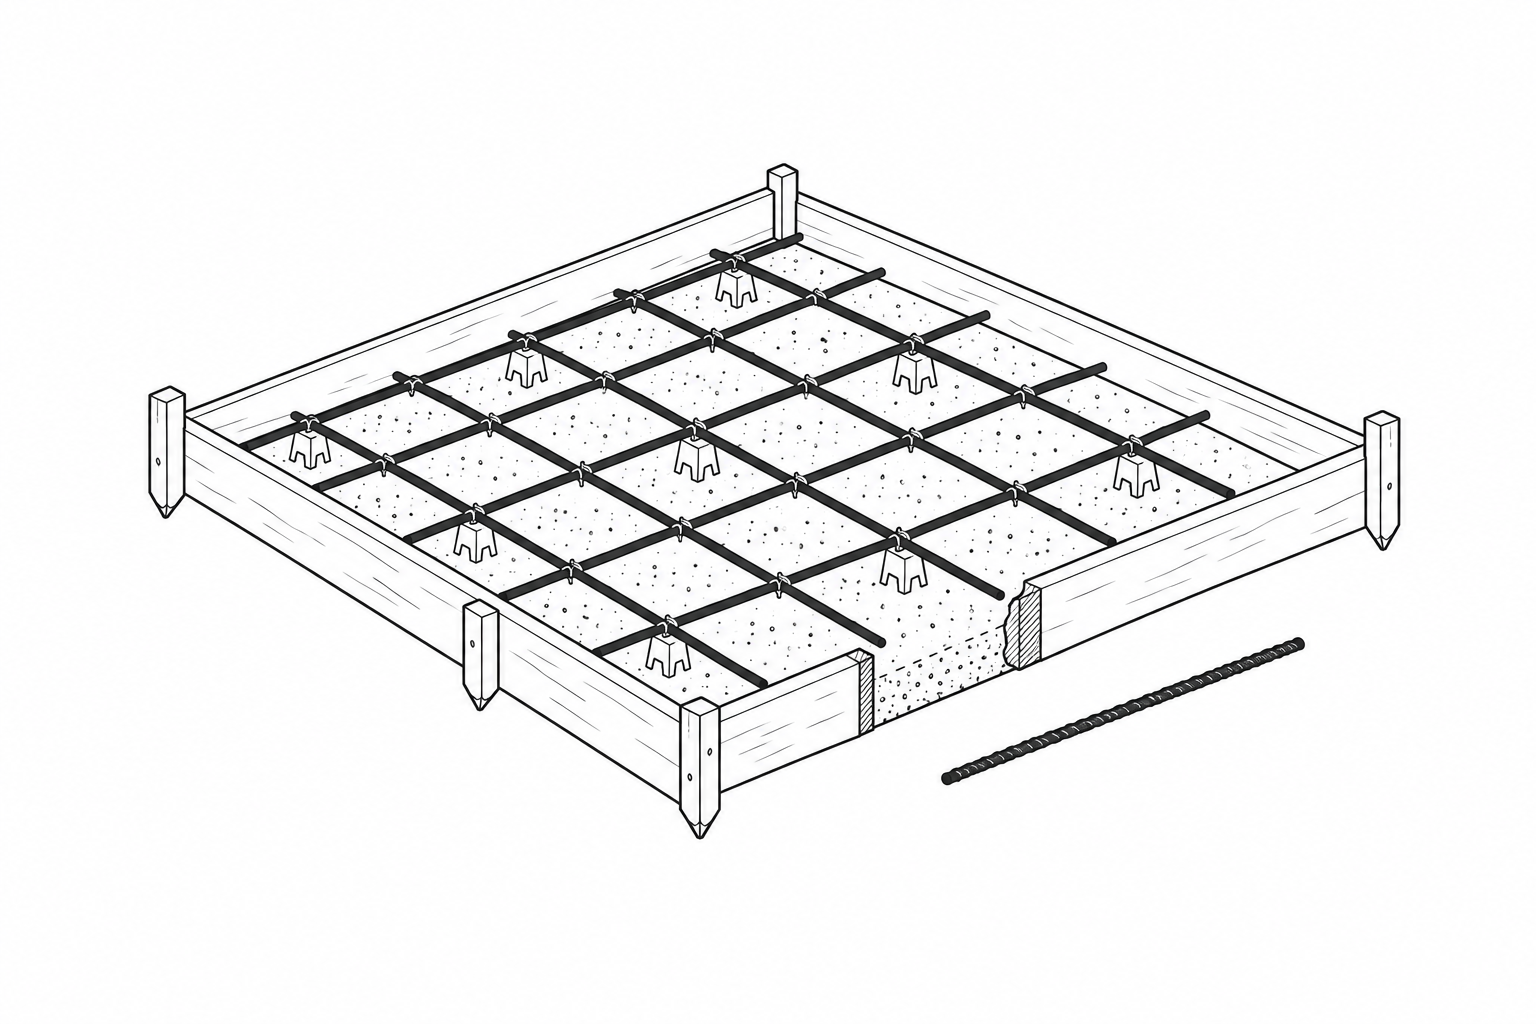
Do you need rebar in a 4 inch concrete slab?
Reinforcement is a design choice. It is not a way to stop cracks. NRMCA says wire mesh and reinforcement in slabs cannot prevent cracking. At the proper location, reinforcement can reduce crack width, and mesh tends to keep cracks and joints from opening up.
If you use it, position matters. The residential code says reinforcement must be supported to stay in place from the center to the upper one-third of the slab for the whole pour. That means the bars sit on supports above the base. Tie the grid, lift it onto bar supports and check it again just before the pour.
If the slab has contraction joints and uses mesh, NRMCA says to cut alternate wires, or preferably stop the mesh, at each joint.
Whether a given slab needs reinforcement depends on its use and on your local rules. Ask your building department. For quantities, use the rebar calculator.
How much concrete to order for a slab
Multiply length by width by thickness, all in feet, and divide by 27 to get cubic yards. A 10×10 ft slab at 4 inches thick is 33.3 cu ft, or 1.2 cu yd.
Order more than the math says. NRMCA advises ordering at least 4 to 10 percent more than the estimate to cover waste, form deflection and an uneven base. This site’s estimates add 5 percent. With that allowance, the 10×10 ft slab is an order of 1.3 cu yd and the 20×20 ft slab is 5.2 cu yd.
Plants have a minimum load. This site assumes 3.5 cu yd, and its estimate adds a short-load fee below that. The 10×10 ft slab is under the minimum and the 20×20 ft slab is not.
If you are near the line, compare bags with a truck on the yard calculator. NRMCA also says to avoid short loads to complete a placement, so order enough the first time.
Tell the plant where the slab is and what it will face. For outdoor slabs exposed to freezing weather, NRMCA says to use air-entrained concrete.
For a slab that stays wet in freezing weather and gets deicing salt, NRMCA’s guidance is 4,000 psi with about 6 percent air for mixes with 3/4 or 1 inch aggregate. Where the slab will not stay wet and deicers will not be used, it gives 3,500 psi. Ask for a slump of 3 to 5 inches, and do not add excess water at the site.
How to pour and finish a concrete slab
Place the concrete
Start at the far end and work toward the near end, placing each load against the concrete already in place. Drop it as close to its final spot as you can, from the chute or with a wheelbarrow, buggy or pump. Move it with a square-ended shovel or a come-along.
Never use a garden rake or any tined tool, because NRMCA says it causes segregation. Tamp along the form edges with a spade or a piece of wood so the concrete is consolidated there.
Screed it level
Rest the screed on the tops of the forms, tilt it forward and draw it across the concrete with a slight sawing motion. Keep a small head of concrete ahead of the board to fill low spots. Do not overwork the surface.
Bull float, then wait
Level the surface with a bull float or a darby soon after strike-off. NRMCA says to finish this before bleed water appears and to keep the float as flat as possible so it does not seal the surface early.
Then stop and wait. Do not go on until the concrete has stopped bleeding and no water sheen is left. Finishing while water is on the surface causes dusting, scaling, crazing, delamination and blisters. A footprint test helps: NRMCA says the surface is ready for final finishing when a footprint sinks between ⅛ and ¼ inch.
Float, edge and texture
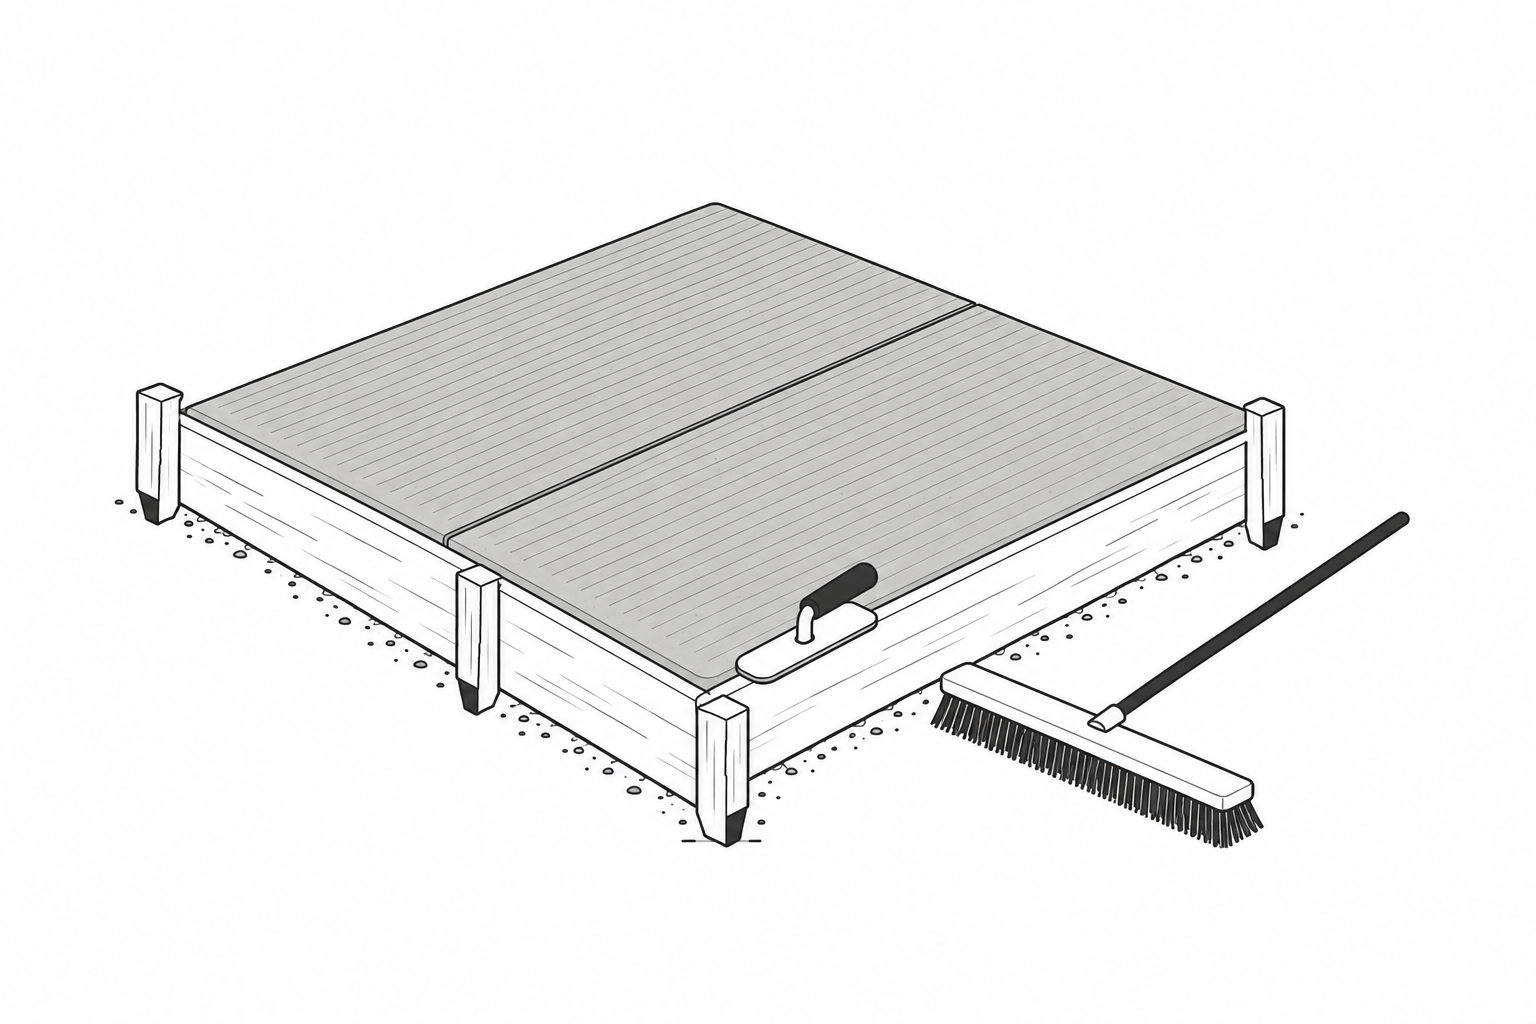
After bleeding stops, float the surface by hand or machine. Floating embeds the aggregate and levels the surface for further finishing. Then run a mason’s trowel between the concrete and the form to break the bond, and use an edging tool for a durable, rounded edge.
For a patio, walkway or driveway, drag a push broom across the floated surface for a non-slip texture. NRMCA says a broom finish is adequate for most exterior surfaces. Do not sprinkle water or cement on the surface to ease finishing, because that causes dusting or scaling. Use a steel trowel on air-entrained concrete with caution.
Control joints in a concrete slab
Concrete shrinks as it dries, and it cracks where the shrinkage is held back. NRMCA describes joints as simply pre-planned cracks. A control joint is a weak line tooled or cut into the slab so the crack forms there.
| Rule | For a 4 inch slab |
|---|---|
| Spacing: 24 to 36 times the slab thickness | 8 to 12 ft. NRMCA's own example is about 10 ft. |
| Longest spacing NRMCA recommends | 15 ft |
| Panel shape | Square or nearly so. Length no more than 1.5 times the width. |
| Depth of the groove | At least one quarter of the slab thickness, never less than 1 in. For this slab: 1 in. |
Plan the layout before the pour. A 20×20 ft slab with one joint across the middle in each direction makes four 10×10 ft panels, which fits the range.
Timing depends on the method. Tooled joints are run early in finishing and run again later so the groove does not bond shut. The blade of the tool should be at least a quarter of the slab depth, and a shallow-bit groover should only make decorative grooves.
A saw cut goes in once the concrete is hard enough that the blade does not tear it. NRMCA gives 4 to 12 hours after finishing for a conventional saw. If the joint edges ravel, wait. Wait too long and uncontrolled cracks can form.
How to cure a concrete slab
Curing begins right after placing and finishing. NRMCA says it should continue for typically 3 to 7 days. The goal is to keep the slab moist and above 50°F. Concrete left to dry out can lose as much as 50 percent of its potential strength compared with moist-cured concrete.
Pick one method and keep it going:
- Curing compound. A liquid membrane product that meets ASTM C309 or C1315. Apply it as soon as the water sheen is gone after final finishing, in two coats at right angles. If the slab will be painted or covered later, choose a wax-free product. NRMCA suggests a second application the next day.
- Damp burlap. Keep it moist for at least 3 days.
- Plastic sheeting. At least 4 mils thick, with overlapped, taped and weighted edges.
Alternate wetting and drying is not an acceptable method. Below 50°F, protect the slab as the cold-weather guide describes. In the first winter, avoid deicing chemicals, as NRMCA advises.
Mistakes that ruin a slab
No slab is crack-free, even when it is done well. Most random cracks that appear early are unsightly but rarely affect the structure. NRMCA lists six causes of most cracks. Each one maps to a step above.
- No joints. Omitting isolation and contraction joints, or jointing badly.
- Poor ground preparation. Topsoil, soft spots or loose fill left under the slab.
- Too much water. High slump, or water added to the load on site.
- Poor finishing. Working the surface while bleed water is on it, or overworking it.
- Fast drying. Rapid moisture loss from new concrete in dry conditions.
- Poor curing. Inadequate curing, or none.
Two more problems come from the schedule. Pouring before the ground work is finished lowers the quality of the slab. Running short and ordering a small extra load to finish the pour is the other.
How to pour a concrete slab: common questions
Can I pour a concrete slab myself?
Yes, for a small slab with help on site. The risk is the timing as much as the skill. The first two sections above show the volume you would handle by hand and what a contractor’s price is made of.
How do I prepare the ground for a concrete slab?
Call 811, remove topsoil and soft spots, compact a gravel base, slope it to drain and build braced forms. The details are in the section on preparing the ground.
Do you need rebar in a 4 inch concrete slab?
Not to prevent cracking, because reinforcement cannot. Whether your slab needs it depends on its use and local rules. If you use it, support it so it sits from the center to the upper third of the slab. See the section on rebar.
How much does a 20x20 concrete slab cost to pour?
This site’s national-average estimate for a 20×20 ft slab, 4 inches thick, is $3,010 to $5,980 when a contractor does the whole job. The materials alone are about $734 to $1,460. Local labor rates change the total. The concrete pad calculator prices it for your metro area, and the patio and driveway pages do the same for those jobs.
What is the cheapest way to pour a concrete slab?
Do the labor yourself, order only the volume you need and avoid rework. The table above shows which lines that removes.
Related calculators
Figures on this site are planning estimates. How we estimate lists the formula, the data sources and the limitations.